Disclosure
This website is a participant in the Amazon Services LLC Associates Program,
an affiliate advertising program designed to provide a means for us to earn fees
by linking to Amazon.com and affiliated sites.
What is the ideal voltage for a healthy 6-volt battery? Our complete voltage chart provides the definitive answer. Understanding these readings is crucial for maintaining your classic car’s unique electrical system.
Proper voltage monitoring prevents unexpected failures and extends battery lifespan. This guide solves the mystery of interpreting your multimeter readings for optimal performance.
Best 6-Volt Batteries for Classic Cars – Detailed Comparison
Optima Batteries 8002-002 6V – Best Overall Performance
The Optima 8002-002 is a premium AGM (Absorbed Glass Mat) battery. It offers superior vibration resistance and a spill-proof design, perfect for classic cars with rough rides. Its deep-cycle capability allows for reliable cranking and stable voltage, even with occasional accessory use.
Universal Power Group UB6906 6V – Best Value Option
For owners seeking reliable power on a budget, the UPG UB6906 is a top choice. This sealed lead-acid battery provides maintenance-free operation and a strong cold cranking amp (CCA) rating. It’s an ideal, cost-effective replacement for many original 6-volt systems.
Antigravity Batteries ATX-6-RS – Best Lightweight Restoration
The Antigravity ATX-6-RS is a revolutionary lithium-ion option. It weighs over 80% less than lead-acid batteries, reducing strain on old mounts. With built-in jump-start functionality, it’s ideal for high-end restorations where weight savings and modern reliability are priorities.
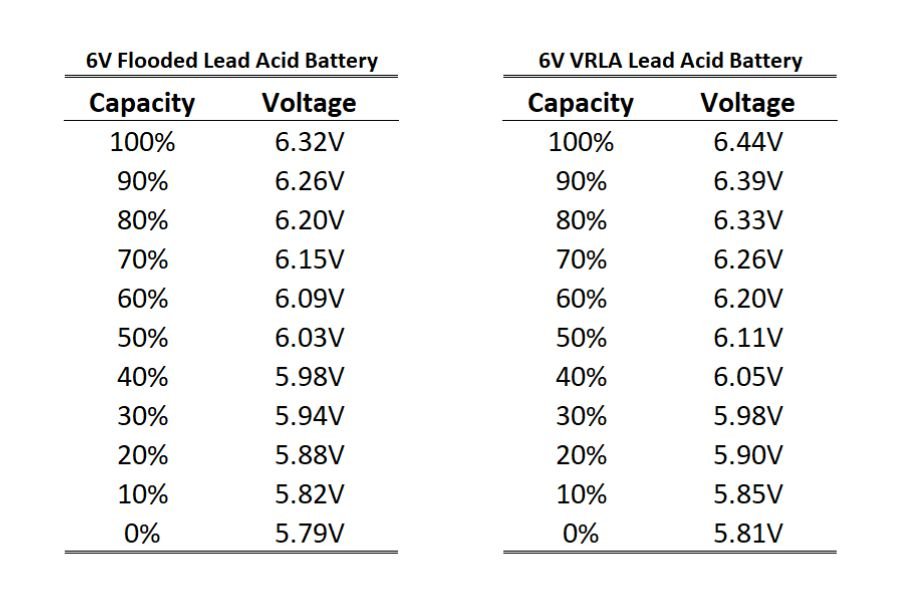
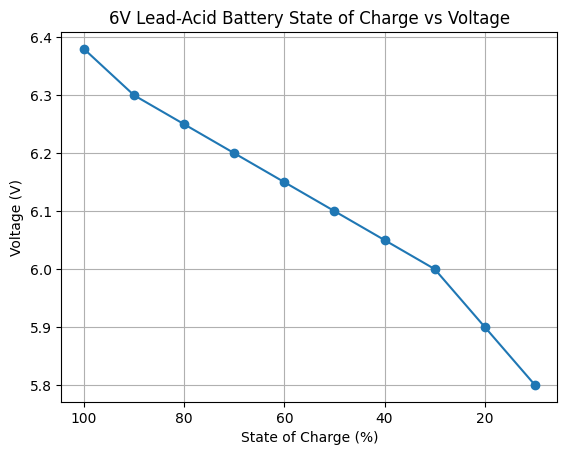
6-Volt Battery Voltage Chart
A precise voltage chart is your essential diagnostic tool. It translates a simple multimeter reading into a clear picture of your battery’s health. This knowledge helps you prevent failures and plan maintenance effectively.
At Rest (Battery not charging or discharging for 2–4 hours)
| Battery Condition | Voltage (6V Battery) | Approx. Charge Level |
|---|---|---|
| Fully charged | 6.35 – 6.40 V | 100% |
| Very good | 6.30 V | 90% |
| Good | 6.25 V | 80% |
| Fair | 6.20 V | 70% |
| Low | 6.15 V | 60% |
| Very low | 6.10 V | 50% |
| Critical | 6.05 V | 40% |
| Severely discharged | 6.00 V | 30% |
| Near dead | 5.90 V | 20% |
| Dead | ≤ 5.80 V | 0–10% |
Below 6.0V for long periods can permanently damage a lead-acid battery.
While Charging (Normal Readings)
| Charging Stage | Voltage Range |
|---|---|
| Bulk charging | 6.9 – 7.2 V |
| Absorption | 7.2 – 7.4 V |
| Float / maintenance | 6.75 – 6.85 V |
Charging above 7.5V may indicate overcharging.
Under Load (Battery powering a device)
| Load Condition | Voltage Seen |
|---|---|
| Light load | 6.1 – 6.3 V |
| Moderate load | 5.9 – 6.1 V |
| Heavy load | 5.5 – 5.8 V |
| Voltage drops below 5.5V | Battery is weak or failing |
Voltage recovers after load is removed if battery is still healthy.
Temperature Effect (Important)
Voltage readings assume 25°C (77°F).
Adjust expectations if temperature changes:
- Cold weather → Voltage reads lower
- Hot weather → Voltage reads slightly higher
Quick Diagnostic Guide
- 6.3–6.4V at rest → Battery is healthy
- Drops below 5.8V under light load → Battery is weak
- Won’t exceed 6.1V after full charge → Sulfated or aging battery
- Rapid voltage drop → Internal damage
Interpreting Key Voltage Readings
Voltage levels indicate the battery’s state of charge and overall condition. Readings vary significantly between a resting battery and one under load. Always test on a battery that has been at rest for several hours for accuracy.
- Fully Charged (Resting): 6.3V – 6.4V. This is the ideal voltage for a healthy, 100% charged 6V battery ready for service.
- Standard Charge (Resting): 6.0V – 6.2V. The battery is functional but could benefit from a full charge to reach peak performance.
- Discharged / Critical (Resting): Below 5.8V. Immediate charging is required. Prolonged storage at this voltage causes permanent sulfation damage.
Voltage Under Load and Charging States
Understanding voltage during operation is just as crucial. A healthy battery will show a voltage drop when cranking, but it must recover quickly.
| State | Voltage Range | Condition Indicated |
|---|---|---|
| Cranking (Engine Start) | 4.8V – 5.2V | Acceptable drop. Should not stay below 5V for more than a few seconds. |
| Charging (Engine Running) | 6.8V – 7.2V | Normal generator/regulator output. Confirms the charging system is active. |
| Post-Charge (Resting 12 hrs) | Below 6.2V | Likely indicates a weak or failing cell that cannot hold a charge. |
Key Takeaway: A resting voltage below 6.0V signals a need for charging. A voltage that drops below 5V during cranking and doesn’t recover suggests a weak battery unable to deliver necessary power.
Essential Maintenance Tips for Your 6-Volt System
Proper care extends battery life and ensures reliable starts. Classic car 6-volt systems require specific attention compared to modern 12-volt setups. Consistent maintenance prevents most common electrical failures.
Proper Charging Procedures for 6V Batteries
Using the correct charger is non-negotiable. A modern 12V charger will destroy a 6V battery. Always use a charger with a dedicated 6-volt setting or a variable rate charger set correctly.
- Set Charger to 6V: Double-check this setting before connecting any cables.
- Connect Cables: Attach positive (red) to positive, negative (black) to negative terminal.
- Use Slow Charge: A trickle charge at 1-2 amps is safest. It prevents overheating and plate damage.
- Monitor Voltage: Stop charging when the battery reaches 6.9-7.2 volts and gases freely.
Terminal and Connection Upkeep
Corrosion is the enemy of any electrical system. Poor connections cause voltage drop, making the battery seem weak. Inspect and clean terminals at least twice a year.
- Clean Terminals: Disconnect cables and scrub posts with a baking soda/water solution and a wire brush.
- Apply Protectant: After cleaning and reconnecting, coat terminals with a thin layer of petroleum jelly or commercial anti-corrosion spray.
- Check Cable Health: Ensure battery cables are the correct, heavy-gauge wire for 6-volt systems. Replace if corroded or cracked.
Pro Tip: For cars in seasonal storage, use a 6V battery maintainer instead of a standard charger. It automatically monitors and applies a tiny charge only when needed, preventing discharge without overcharging.
Troubleshooting Common 6-Volt Battery Problems
Even with good maintenance, issues can arise. Diagnosing problems correctly saves time and money. Use your multimeter and the voltage chart as your primary diagnostic tools.
Diagnosing a Battery That Won’t Hold a Charge
If your battery consistently reads low after charging, a systematic check is needed. The problem could be the battery itself, or a parasitic drain in the car’s system.
- Perform a Load Test: After a full charge, use a load tester. A healthy 6V battery should maintain above 5V for 15 seconds under a 75-100 amp load.
- Check for Parasitic Drain: With the car off, disconnect the negative terminal. Place a multimeter in series between the terminal and post. A reading over 50 milliamps (0.05A) indicates an electrical drain.
- Inspect the Charging System: With the engine running at moderate RPM, check voltage at the battery posts. It should read between 6.8V and 7.2V.
Addressing Slow Cranking and Dim Lights
These symptoms point to insufficient voltage reaching the starter and accessories. The root cause is often poor connections, not necessarily a dead battery.
- Voltage Drop Test: Test voltage between the battery post and the cable end while cranking. A drop over 0.3V indicates a bad connection at that terminal.
- Ground Connection Check: A poor ground is a common culprit. Ensure the ground cable connects cleanly to both the battery and the engine block or chassis.
- Starter Health: A worn starter motor can draw excessive current, overwhelming a good battery. Listen for labored, sluggish cranking sounds.
Diagnostic Summary: Start with a simple voltage test. If the resting voltage is good but cranking voltage plummets, focus on connections and the starter. If the resting voltage is chronically low, suspect the battery or a parasitic drain.
Long-Term Storage and Winterization for 6V Batteries
Classic cars often face long periods of inactivity. Improper storage is a leading cause of premature battery failure. A proper storage plan preserves your battery’s health and capacity.
Preparing Your Battery for Seasonal Storage
Avoid simply disconnecting the battery and leaving it in the car. Temperature fluctuations and self-discharge will damage it. Follow these steps for optimal preservation.
- Give a Full Charge: Start with a battery at 100% (6.3-6.4V). A discharged battery will sulfate rapidly during storage.
- Clean and Disconnect: Clean the terminals thoroughly. Then, disconnect the negative cable first, followed by the positive.
- Choose Storage Location: Store the battery in a cool, dry place away from concrete floors. Use a wooden board or rubber mat as an insulator.
Maintenance Charging vs. Trickle Charging
Not all low-current chargers are equal. Using the wrong type for months can boil your battery dry or undercharge it.
| Charger Type | How It Works | Best Use Case |
|---|---|---|
| Battery Maintainer | Monitors voltage and only engages when needed to top off charge. Fully automatic. | Ideal for long-term storage (3+ months). Prevents overcharging. |
| Manual Trickle Charger | Provides a constant, low amperage (1-2A) charge indefinitely. | Suitable for short-term storage (under 1 month) with frequent voltage checks. |
| Smart Charger | Uses multi-stage charging (bulk, absorption, float) and includes a maintenance mode. | The best overall option for both recovery charging and long-term storage. |
Storage Rule of Thumb: For storage under three months, a full charge and disconnect may suffice. For longer periods, a 6-volt battery maintainer is a mandatory investment to prevent irreversible sulfation and ensure a ready-to-start classic.
Upgrading and Modernizing Your Classic Car Electrical System
Many owners consider upgrades to improve reliability. Modern components can solve common 6-volt system weaknesses. It’s crucial to understand the options and their implications.
Converting from 6-Volt to 12-Volt: Pros and Cons
A full conversion is a major project but offers significant benefits. It also comes with substantial cost and effort. Weigh these factors carefully before deciding.
- Pros: Brighter lights, faster cranking, easier accessory support (radios, fans), and widely available modern parts.
- Cons: High cost and labor. Requires changing the generator/alternator, regulator, starter, ignition coil, bulbs, gauges, and motor (wipers, heater).
- Consideration: A full conversion can diminish a car’s originality and value for concours judging.
High-Performance 6-Volt Upgrades
You can enhance reliability without a full conversion. These targeted upgrades address specific weaknesses in the original 6V design.
- Heavy-Duty Cables: Replace old, thin cables with 00 or 0 gauge copper cables. This reduces voltage drop to the starter and lights dramatically.
- Electronic Voltage Regulator: Swap the old mechanical regulator for a solid-state electronic unit. It provides more stable charging and requires no adjustments.
- LED Bulb Conversion: Replace incandescent bulbs with 6V LED equivalents. They draw far less current, reducing load on the generator and brightening output.
Expert Recommendation: For most owners, starting with cable and regulator upgrades yields the biggest reliability improvement for the least investment. This preserves originality while solving the most common electrical performance issues.
Essential Tools for 6-Volt Battery Maintenance
Having the right tools makes maintenance simple and safe. You don’t need a professional garage setup. A few key items will cover 95% of your diagnostic and upkeep needs.
Must-Have Diagnostic Equipment
Accurate diagnosis starts with reliable measurements. Guessing about voltage or connections leads to wasted time and money. Invest in these fundamental tools.
- Digital Multimeter: A quality auto-ranging DMM is indispensable. Use it to measure resting voltage, charging voltage, and parasitic drain.
- Hydrometer (for non-sealed batteries): This tool tests the specific gravity of the electrolyte in each cell. It provides the most accurate state-of-charge reading.
- Battery Load Tester: This applies a simulated cranking load to the battery. It reveals weakness that a simple voltage test might miss.
Basic Maintenance and Safety Kit
Proper upkeep prevents problems before they start. This kit handles routine cleaning, connection work, and safe charging practices.
- Terminal Cleaning Tool: A combination wire brush and post cleaner. It ensures metal-to-metal contact by removing all corrosion.
- Insulated Wrenches: Use the correct size (often 5/16″ and 3/8″) to avoid shorting the terminals against the car’s body during work.
- 6-Volt Battery Charger/Maintainer: As discussed, a dedicated smart charger for 6V systems is non-negotiable for proper care.
- Personal Safety Gear: Always wear safety glasses and chemical-resistant gloves when handling batteries to protect from acid and sparks.
Tool Priority: If you buy only one tool, make it a good digital multimeter. It is the cornerstone of all electrical diagnostics. Pair it with a terminal cleaning brush and you can solve most common issues.
Safety Precautions for Handling 6-Volt Batteries
Working with car batteries involves real hazards. Proper safety protects you and your classic car from harm. These rules apply to all batteries, but 6-volt systems have unique considerations.
Preventing Short Circuits and Sparks
A 6-volt battery can deliver extremely high current, even if the voltage is low. A short circuit can weld tools, cause severe burns, or start a fire. Always follow a safe disconnection sequence.
- Disconnect Negative First: Always remove the negative (ground) cable first. This breaks the circuit and prevents a short if your wrench touches the car’s body.
- Then Disconnect Positive: Once the ground is off, the battery is isolated. You can safely remove the positive cable.
- Reconnect in Reverse: When reinstalling, connect the positive cable first, then the negative. This keeps the final connection away from the car’s grounded frame.
Managing Acid and Corrosion Risks
Even sealed batteries can vent corrosive gases. Traditional flooded-cell batteries contain sulfuric acid. Proper handling minimizes exposure and damage.
- Wear Protective Gear: Acid-resistant gloves and safety glasses are mandatory. An apron protects your clothing from acid spills and corrosion dust.
- Neutralize Spills: Keep baking soda and water nearby. It instantly neutralizes battery acid on contact. Flood the area, let it fizz, then wipe clean.
- Ventilate the Area: Always charge or work on batteries in a well-ventilated space. They emit explosive hydrogen gas during charging. No sparks or flames nearby.
- Eye Wash Ready: Have clean water accessible. If acid contacts skin or eyes, flush immediately with copious water for 15 minutes and seek medical attention.
Golden Safety Rule: Treat every battery as if it is fully charged and capable of a dead short. The “Disconnect Negative First” procedure is the single most important habit to prevent dangerous accidents.
Conclusion: Mastering Your 6-Volt Battery for Reliable Performance
Understanding your 6-volt battery voltage chart is the key to predictable classic car ownership. It transforms guesswork into precise diagnostics. Proper maintenance extends battery life and prevents roadside failures.
Your best practice is regular voltage checks and using a dedicated 6V maintainer during storage. This simple routine prevents most common problems. Invest in a good multimeter and make it a habit.
Start by testing your battery’s resting voltage today. Compare it to the chart and take action if needed. Your classic car’s reliability depends on this single component.
With this knowledge, you can enjoy every drive with confidence. Your well-maintained 6-volt system will provide dependable starts for years to come.
Frequently Asked Questions about 6-Volt Batteries
What is a good voltage for a 6-volt battery?
A fully charged and healthy 6-volt battery should read between 6.3 and 6.4 volts when at rest for several hours. A reading of 6.0 to 6.2 volts indicates a partial charge, while anything below 5.8 volts is considered discharged and requires immediate attention to prevent damage.
These readings assume the battery is not under load or recently charged. Always test voltage after the battery has settled for accurate diagnostics of its true state of charge and health.
How do you charge a 6-volt battery properly?
Always use a charger with a dedicated 6-volt setting. Connect the positive (red) clamp to the positive terminal first, then the negative (black) to the negative terminal. Use a slow, trickle charge at 1-2 amps to safely bring the battery to full capacity.
Monitor the voltage during charging. Stop when it reaches between 6.9 and 7.2 volts. Using a modern smart charger or maintainer designed for 6V systems is the safest method to avoid overcharging.
Can you jump-start a 6-volt car with a 12-volt battery?
No, you should never jump-start a 6-volt system directly with a 12-volt battery. The higher voltage can severely damage the starter motor, generator, ignition coil, and all light bulbs in the classic car. The electrical system is not designed to handle 12 volts.
The correct method is to use another 6-volt battery as a booster. If unavailable, the safest alternative is to slowly charge the 6V battery with a proper charger until it has enough power to crank the engine.
Why does my 6-volt battery keep dying?
Chronic battery death is usually caused by one of three issues: a parasitic drain in the car’s wiring, a faulty charging system (generator/regulator), or a weak battery that can no longer hold a charge. Old, corroded cables causing high resistance can also mimic a dead battery.
Diagnose by checking for a parasitic drain with a multimeter and testing the charging system voltage with the engine running. A battery that won’t hold a charge after a proper charge cycle is likely sulfated and needs replacement.
What is the best 6-volt battery for a classic car?
The “best” battery depends on your needs. For overall performance and vibration resistance, the Optima 8002-002 6V AGM battery is a top choice. For value, the Universal Power Group UB6906 is reliable. For high-end restorations seeking weight savings, a lithium-ion option like the Antigravity ATX-6-RS is ideal.
Consider your budget, driving frequency, and whether you prioritize maintenance-free operation, original appearance, or maximum cranking power when making your selection.
How long should a 6-volt battery last?
With proper maintenance, a quality 6-volt battery should last between 3 to 5 years. Factors like climate, frequency of use, and adherence to proper storage procedures significantly impact lifespan. Batteries in rarely driven cars that are not maintained often fail sooner.
Extending battery life requires keeping it fully charged, preventing deep discharges, cleaning terminals regularly, and using a maintainer during long storage periods to combat sulfation.
What voltage should a 6-volt battery read when cranking?
During engine cranking, a healthy 6-volt battery will show a temporary voltage drop. It should stay above 5.0 volts for the duration of the crank. A reading that dips below 4.8 volts indicates a weak battery struggling to deliver the necessary current to the starter motor.
If the voltage plunges and the engine cranks very slowly, the battery is likely unable to sustain the load. This is a clear sign it needs charging or replacement, provided the starter and cables are in good condition.
Is it worth converting my classic car to 12 volts?
A 12-volt conversion offers benefits like brighter lights, easier accessory addition, and readily available parts. However, it is a complex and costly project involving the alternator, starter, ignition, and all bulbs and motors. It can also reduce the car’s originality and value for purists.
For many owners, upgrading the existing 6-volt system with heavy-duty cables and an electronic regulator provides much-improved reliability without the cost and effort of a full conversion. Evaluate your technical skills and goals carefully.