
Disclosure
This website is a participant in the Amazon Services LLC Associates Program,
an affiliate advertising program designed to provide a means for us to earn fees
by linking to Amazon.com and affiliated sites.
Few things are more frustrating for a vehicle owner than a dead battery, especially when it happens unexpectedly. While a simple multimeter can give you a resting voltage reading, it often doesn’t tell the full story of your battery’s health. To truly understand if your battery can withstand the demands of starting your engine or powering your accessories, a battery load test is essential.
This crucial diagnostic procedure, when interpreted correctly with a reliable Battery Load Test Voltage Chart: Pass Vs. Fail Results, can save you from inconvenient breakdowns and costly replacements. For DIY mechanics, car owners, and auto enthusiasts alike, mastering the art of battery load testing is a fundamental skill for maintaining vehicle reliability in 2026 and beyond.
Key Takeaways
- A battery load test simulates real-world starting conditions, providing a more accurate assessment of battery health than a simple voltage check.
- The Battery Load Test Voltage Chart: Pass Vs. Fail Results provides critical thresholds that determine if a battery has sufficient cranking power.
- Understanding factors like battery type, CCA rating, and temperature is crucial for accurate load test interpretation.
- A battery failing a load test typically indicates internal damage, insufficient capacity, or sulfation, necessitating replacement.
- Regular load testing can help predict battery failure, allowing for proactive maintenance and preventing unexpected breakdowns.
The Purpose of a Battery Load Test
The automotive battery is the heart of your vehicle’s electrical system, responsible for delivering a significant surge of power to crank the engine and energize various components. While it may seem like a simple box, its internal chemistry and structural integrity are vital for reliable operation. Many drivers only think about their battery when it fails, but proactive testing can prevent this headache.
Why Resting Voltage Isn’t Enough
Imagine a person who looks perfectly healthy but can’t run a mile without collapsing. Their resting state might seem fine, but under stress, their limitations become clear. A car battery behaves similarly. A multimeter reading of a battery’s open-circuit (resting) voltage – typically around 12.6V for a fully charged 12V lead-acid battery – tells you its current state of charge but not its ability to deliver high amperage under load.
A battery could show a good resting voltage but still be “weak” internally, unable to provide the hundreds of amps needed to turn over a cold engine. This is where the load test shines. For a deeper dive into resting voltages, you can explore the 12-volt battery voltage chart.
What a Load Test Reveals
A battery load test simulates the immense electrical demand placed on a battery during engine cranking. It applies a controlled, high-amperage draw for a short period (typically 10-15 seconds) while monitoring the battery’s voltage drop. The key here is not just the initial voltage, but how well the battery maintains its voltage under stress.
A healthy battery will experience a temporary voltage drop but quickly recover and hold a stable voltage above a critical threshold. A weak battery, however, will show a significant, rapid voltage drop below this threshold, indicating its inability to supply the necessary power.
This test is particularly important for various reasons:
- Predictive Maintenance: It helps identify batteries nearing the end of their service life before they strand you.
- Diagnosing Starting Problems: If your car is slow to start, but your alternator is charging correctly, a load test can pinpoint if the battery is the culprit.
- Verifying Battery Health: Whether you’re buying a used car or checking your own, a load test provides an objective measure of battery condition.
- Preventing Damage to Other Components: A failing battery can overwork your alternator and starter, potentially leading to more expensive repairs down the line.
Types of Load Testers
Several types of load testers are available, each with its own advantages:
- Carbon Pile Load Tester: This is the traditional, robust tool favored by many professionals. It uses a carbon pile resistor to create an adjustable, high-amperage load. These testers are highly accurate but can be bulky and generate significant heat.
- Conductance Tester: Modern and increasingly popular, these digital testers don’t apply a heavy load in the traditional sense. Instead, they measure the battery’s conductance (its ability to conduct current) and internal resistance. They are quick, safe, and can often test partially charged batteries, making them ideal for quick checks. While they don’t mimic the exact cranking load, they correlate very well with the battery’s actual cranking ability.
- Fixed Load Tester: These are simpler, often handheld units that apply a predetermined load (e.g., 100A, 500A) for a fixed duration. They are less flexible than carbon pile testers but are affordable and effective for general use.
Regardless of the type of tester used, the fundamental principle remains: assess the battery’s ability to deliver current under demand. The resulting voltage readings, when compared against the appropriate Battery Load Test Voltage Chart: Pass Vs. Fail Results, will provide the definitive answer to your battery’s true health.
Pull Quote: “A battery load test is the ultimate stress test for your vehicle’s power source, revealing its true strength or hidden weaknesses under pressure.”
The Battery Load Test Voltage Chart: Pass Vs. Fail Results

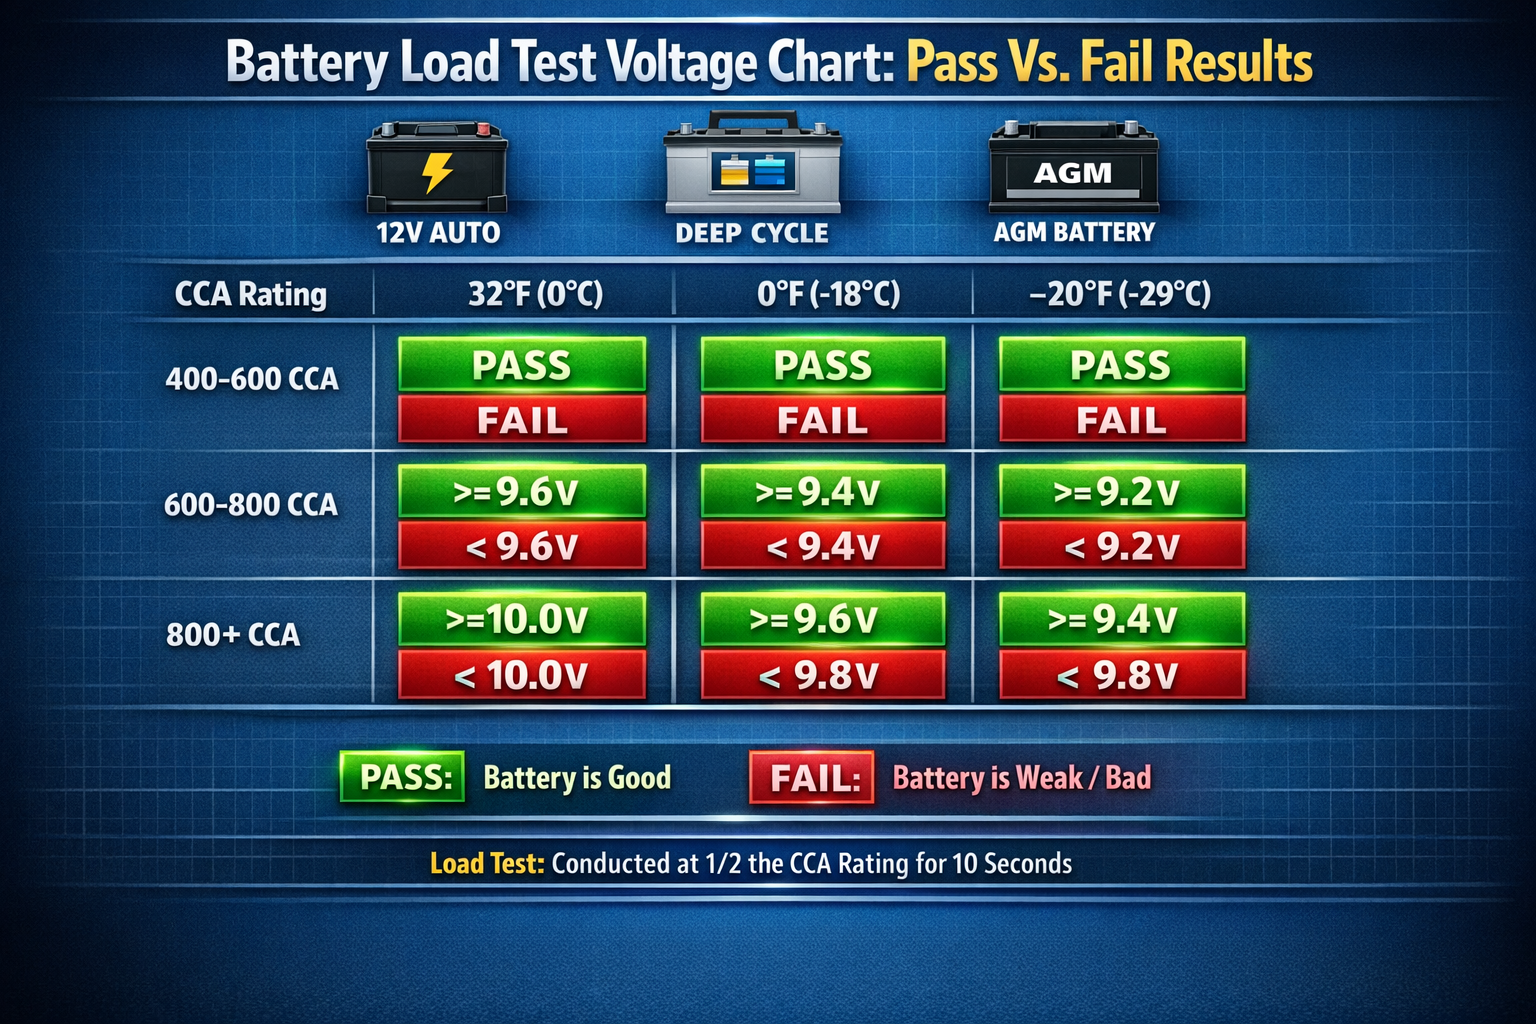
Interpreting the results of a battery load test requires more than just noting a voltage number; it requires comparison against established standards. These standards are typically presented in a Battery Load Test Voltage Chart: Pass Vs. Fail Results, which outlines the minimum acceptable voltage drop for a battery based on its Cold Cranking Amps (CCA) rating and sometimes even ambient temperature.
Key Factors Influencing Load Test Results
Before diving into the charts, it’s crucial to understand the variables that affect a battery’s performance during a load test:
- State of Charge (SOC): A battery must be at least 75% charged for an accurate load test. Ideally, it should be fully charged (12.6V or higher for a 12V lead-acid battery). Testing a discharged battery will invariably lead to a “fail” result, even if the battery is healthy. Many modern testers can tell you the state of charge, but a separate voltmeter check before the load test is always a good practice.
- Cold Cranking Amps (CCA): This is the most critical rating for automotive starting batteries. CCA indicates the number of amperes a 12-volt battery can deliver for 30 seconds at 0°F (-18°C) while maintaining a voltage of at least 7.2 volts. The load applied during the test is directly proportional to the battery’s CCA rating, typically half of its rated CCA. So, a battery with 600 CCA would be tested with a 300A load.
- Temperature: Battery performance decreases significantly in cold weather. While load test charts usually account for this by providing a standard threshold, extremely cold temperatures can temporarily reduce a battery’s effective CCA and internal resistance, impacting test outcomes. Some advanced testers have temperature compensation, or you might need to adjust the chart’s minimum voltage slightly upwards for very warm conditions.
- Battery Type: While the most common automotive batteries are flooded lead-acid, Absorbed Glass Mat (AGM) and Gel batteries are also prevalent. While the general principles apply, specific voltage thresholds might vary slightly. For instance, an AGM battery voltage chart under load might show slightly different ideal ranges compared to a traditional flooded battery. Deep cycle batteries, found in RVs or marine applications, also have different characteristics and are not designed for high cranking loads, so their testing procedures differ. You can learn more about AGM battery state of charge for general reference.
General Pass/Fail Criteria
For a typical 12V automotive battery, after applying a load equivalent to half its CCA rating for 10-15 seconds, the voltage should not drop below a specific threshold. This threshold is almost universally 9.6 volts.
General Rule of Thumb for 12V Batteries (Flooded and AGM):
- Pass: Voltage remains at or above 9.6 volts during the 10-15 second load test.
- Fail: Voltage drops below 9.6 volts during the 10-15 second load test.
Some manufacturers or specific testing standards might suggest a slightly higher pass voltage (e.g., 10.0V for new batteries or warmer temperatures) or a slightly lower one for specific applications, but 9.6V is the most widely accepted benchmark.
Detailed Battery Load Test Voltage Chart: Pass Vs. Fail Results
Let’s illustrate with a more detailed chart that considers CCA ratings. This chart assumes the battery is fully charged (12.6V+) and the test is performed at standard room temperature (around 70°F / 21°C).
| Battery CCA Rating | Applied Load (A) | Minimum Pass Voltage (V) | Result | Interpretation |
|---|---|---|---|---|
| Below 500 | 1/2 CCA | 9.5 | Pass | Good Health |
| Below 500 | 1/2 CCA | Below 9.5 | Fail | Weak/Bad Battery |
| 500 – 700 | 1/2 CCA | 9.6 | Pass | Good Health |
| 500 – 700 | 1/2 CCA | Below 9.6 | Fail | Weak/Bad Battery |
| 700 – 900 | 1/2 CCA | 9.7 | Pass | Good Health |
| 700 – 900 | 1/2 CCA | Below 9.7 | Fail | Weak/Bad Battery |
| 900 – 1000+ | 1/2 CCA | 9.8 | Pass | Good Health |
| 900 – 1000+ | 1/2 CCA | Below 9.8 | Fail | Weak/Bad Battery |
Note: These values are general guidelines. Always consult your battery manufacturer’s specifications or your load tester’s manual for the most accurate thresholds.
The Role of Temperature
When testing in very cold conditions, a battery’s performance naturally dips. Some charts adjust the pass/fail threshold based on temperature. For example:
| Temperature | Minimum Pass Voltage (V) |
|---|---|
| 70°F (21°C) and above | 9.6 |
| 30-69°F (-1 to 20°C) | 9.5 |
| 0-29°F (-18 to -2°C) | 9.4 |
This adjustment accounts for the decreased efficiency of the battery’s chemical reactions in colder environments. It’s a good idea to factor this in, especially if you live in a region with extreme temperature fluctuations.
The “Marginal” Results
Sometimes, a battery might just barely pass a load test, hovering right at the 9.6V threshold. This “marginal” result usually indicates a battery that is still functional but is likely nearing the end of its lifespan.
While it might pass the test today, its performance will likely degrade rapidly, especially under stressful conditions like extreme cold or frequent short trips. In such cases, it’s advisable to consider a proactive replacement to avoid being stranded. A battery that passes marginally in 2026 might be a complete failure in early 2027.
Special Considerations for Deep Cycle Batteries
It’s important to reiterate that the standard load test, using half the CCA rating, is primarily for starting batteries. Deep cycle batteries, such as those found in golf carts, RVs, or solar setups (see 12V deep cycle golf cart battery voltage chart), are designed for sustained, lower-amperage discharge over long periods, not for delivering a massive surge of current.
Applying a high CCA-based load to a deep cycle battery can be misleading and potentially damaging. For deep cycle batteries, it’s more appropriate to perform a capacity test (discharge test) or use a conductance tester that provides insights into internal resistance, rather than a traditional load test. For those interested in golf cart batteries, there are specific charts like the 36-volt golf cart battery voltage chart or the 48-volt golf cart battery voltage information available.
By carefully consulting the Battery Load Test Voltage Chart: Pass Vs. Fail Results and understanding the surrounding factors, you can accurately diagnose the health of your vehicle’s battery and make informed decisions about maintenance or replacement.
Performing the Load Test and Interpreting the Battery Load Test Voltage Chart: Pass Vs. Fail Results
Executing a battery load test correctly is just as important as knowing how to read the chart. Safety and accuracy are paramount. This section will walk you through the steps and provide further guidance on interpreting your findings.
Essential Tools and Safety Precautions
Before you begin, gather the necessary tools and prioritize safety:
- Battery Load Tester: A carbon pile, fixed load, or conductance tester.
- Multimeter (Optional but Recommended): For checking resting voltage and confirming readings. Learn more about voltage basics to understand your readings.
- Battery Terminal Brush: For cleaning corroded terminals.
- Safety Glasses and Gloves: Always protect your eyes and hands when working with batteries.
- Wrench: To loosen and tighten battery terminals.
- Baking Soda and Water Solution: To neutralize any spilled battery acid.
Safety First! Batteries contain sulfuric acid and produce explosive hydrogen gas.
- Ensure good ventilation.
- Never smoke or use open flames near a battery.
- Remove jewelry or metallic objects that could short-circuit terminals.
- Wear appropriate PPE.
Step-by-Step Load Test Procedure (Using a Carbon Pile/Fixed Load Tester)
- Preparation is Key:
- Fully Charge the Battery: As mentioned, the battery must be at least 75% charged, ideally fully charged (12.6V+ for 12V). If not, charge it before testing.
- Clean Terminals: Ensure the battery terminals and cable clamps are clean and free of corrosion. Poor connections can skew test results.
- Turn Off All Accessories: Ensure the vehicle’s ignition is off, and all lights, radio, and other accessories are switched off to avoid parasitic drains that could affect readings.
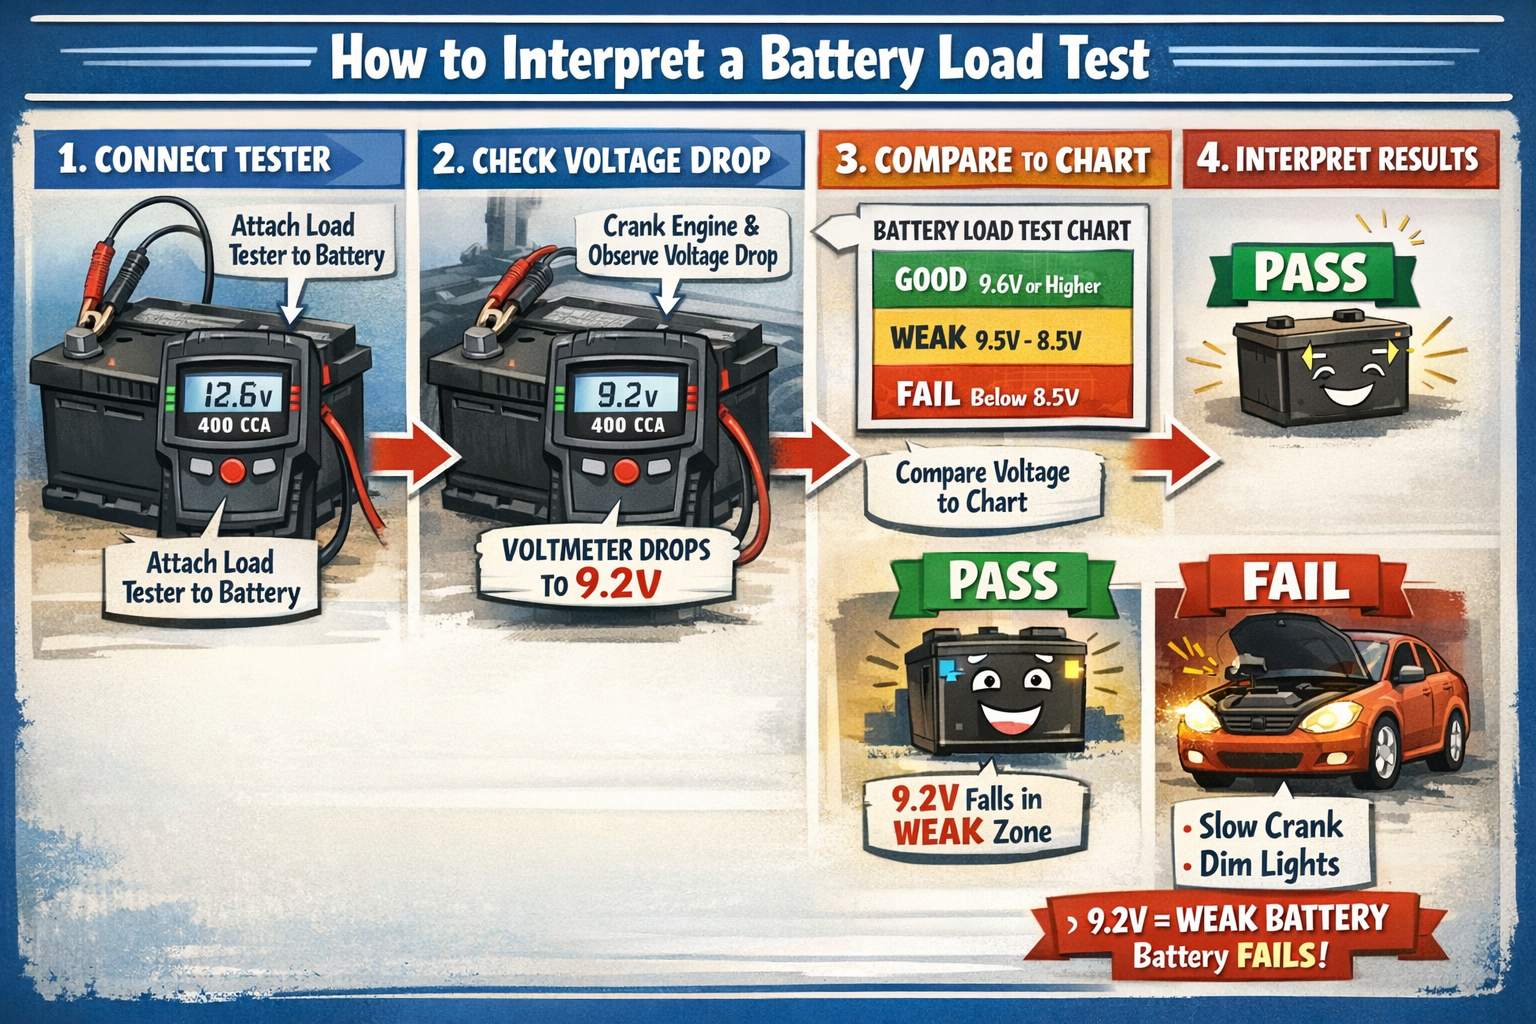
- Connect the Load Tester:
- Connect the positive (+) lead of the load tester to the positive (+) battery terminal.
- Connect the negative (-) lead of the load tester to the negative (-) battery terminal.
- Ensure connections are secure and tight.
- Determine the Test Load:
- Locate the battery’s CCA rating, usually printed on a label on the battery itself.
- Set your carbon pile tester to half of the battery’s CCA rating. For example, if the battery is rated at 600 CCA, set the load to 300 amps. If using a fixed load tester, ensure its rating is appropriate (e.g., 100A for smaller batteries, 500A for larger ones).
- Perform the Test:
- Apply the load for 10-15 seconds.
- Observe the voltage reading on the tester’s gauge or digital display during this period. Do not hold the load for longer than 15 seconds to avoid excessive heat and damage to the battery or tester.
- Release the load immediately after 10-15 seconds.
- Record and Interpret Results:
- Note the lowest voltage reading observed during the load test.
- Refer back to the Battery Load Test Voltage Chart: Pass Vs. Fail Results (like the one provided earlier) or your tester’s manual.
- Compare your recorded minimum voltage against the chart’s minimum pass voltage for your battery’s CCA rating and temperature.
- Example Scenario:
- Battery CCA: 650
- Applied Load: 325 Amps (half of 650)
- Lowest observed voltage: 9.7V
- Referring to the chart (500-700 CCA, 9.6V minimum pass), this battery passes.
- Example Scenario 2:
- Battery CCA: 750
- Applied Load: 375 Amps (half of 750)
- Lowest observed voltage: 9.5V
- Referring to the chart (700-900 CCA, 9.7V minimum pass), this battery fails.
Interpreting Conductance Tester Results
Conductance testers work differently. They typically provide readings in Siemens (S) or mhos (the inverse of ohms) and often display a “Good Battery,” “Charge & Retest,” or “Bad Battery” message directly. They also often estimate the battery’s CCA capacity. If a conductance tester reports “Good” and provides a CCA reading close to or exceeding the battery’s rated CCA, the battery is healthy.
If it reports “Charge & Retest,” the battery wasn’t sufficiently charged for an accurate assessment. If it reports “Bad Battery” or a significantly lower CCA than rated, the battery is likely failing. Always follow the specific instructions provided with your conductance tester, as different models may have unique interpretation guidelines.
What “Fail” Means: Common Battery Problems
If your battery fails the load test based on the Battery Load Test Voltage Chart: Pass Vs. Fail Results, it generally points to one of the following issues:
- Sulfation: The most common killer of lead-acid batteries. Over time, lead sulfate crystals can build up on the battery plates, reducing the battery’s ability to hold a charge and deliver current. This is often exacerbated by undercharging or leaving the battery discharged for extended periods.
- Internal Short Circuit: A physical breakdown within the battery where two plates touch, causing a rapid discharge. This is usually due to plate damage or shedding of active material.
- Worn-Out Plates: With age and repeated charge/discharge cycles, the active material on the battery plates degrades and sheds, reducing the battery’s overall capacity.
- Low Electrolyte Level (Flooded Batteries): If the electrolyte (acid and water mixture) level drops below the plates, the exposed plates will sulfate and lose capacity. This can sometimes be rectified by topping up with distilled water and recharging, but significant damage is often irreversible.
- Corroded Internal Connections: Internal connections within the battery can corrode, increasing internal resistance and hindering current flow.
In most cases where a battery fails a load test, especially an automotive starting battery, replacement is the recommended course of action. Attempting to “recover” a severely degraded battery is often a temporary fix and not worth the risk of being stranded.
When to Perform a Load Test
Regular load testing is a smart practice. Consider performing a load test:
- Annually: As part of your routine vehicle maintenance, especially as the battery approaches 3 years of age.
- Before Winter: Cold weather is brutal on batteries. Testing before winter sets in can prevent cold-start failures.
- If You Experience Starting Issues: Slow cranking, dimming lights when starting, or other electrical quirks can be early signs of battery trouble. You might also notice 7 symptoms of low battery voltage which would prompt a load test.
- Before a Long Trip: Ensure your battery is road-trip ready.
- When Buying a Used Battery or Vehicle: To verify the battery’s condition.
By diligently following these steps and accurately interpreting the Battery Load Test Voltage Chart: Pass Vs. Fail Results, you empower yourself to make informed decisions about your vehicle’s battery health, ensuring reliable starts and peace of mind on the road in 2026.
Beyond the Chart: What to Do After a Pass or Fail
Understanding the Battery Load Test Voltage Chart: Pass Vs. Fail Results is a crucial step, but what comes next? Whether your battery passes with flying colors or fails spectacularly, there are important actions to consider. This section will guide you through the next steps, ensuring you leverage your diagnostic efforts effectively.
If the Battery Passes the Load Test
Congratulations! A passing load test indicates your battery is currently in good health and capable of meeting your vehicle’s demands. However, a “pass” doesn’t mean you can forget about it entirely.
- Routine Maintenance: Even a healthy battery benefits from ongoing care.
- Keep Terminals Clean: Regularly inspect and clean battery terminals to prevent corrosion, which can impede current flow and put extra strain on the battery. A simple wire brush and a baking soda solution can do wonders.
- Check Electrolyte Levels (Flooded Batteries): For traditional flooded batteries with removable caps, periodically check the electrolyte level. If low, top up with distilled water. Never use tap water.
- Ensure Secure Mounting: A battery that isn’t securely mounted can experience vibration, leading to internal damage over time.
- Monitor Charging System: A healthy battery relies on a healthy charging system. Periodically check your alternator’s output voltage. A typical charging voltage should be between 13.8V and 14.7V when the engine is running. If your alternator isn’t charging correctly, even a good battery will eventually die.
- Note the Age: Even a passing battery will eventually wear out. Most automotive batteries have a lifespan of 3-5 years, although this can vary significantly based on climate, driving habits, and maintenance. If your battery is approaching or exceeding this age, even a “pass” might suggest it’s living on borrowed time. Consider a proactive replacement within the next year, especially if you live in an area with harsh winters or scorching summers.
- Re-evaluate if Issues Persist: If your battery passed the load test, but you’re still experiencing starting problems or electrical issues, the battery isn’t the culprit. You’ll need to investigate other components of your starting or charging system.
- Starter Motor: A failing starter motor can draw excessive current or simply not engage properly, leading to slow cranking or no-start conditions, even with a strong battery.
- Alternator: An alternator that isn’t charging adequately will cause the battery to slowly discharge over time. A voltage check with the engine running can confirm this.
- Parasitic Drains: A component that continues to draw power when the vehicle is off can slowly drain a healthy battery. Diagnosing parasitic drains often requires a multimeter and patience.
- Corroded Cables/Connections: Corroded or loose battery cables, ground wires, or starter solenoid connections can restrict current flow, mimicking a weak battery.
If the Battery Fails the Load Test
A failed load test, clearly indicated by the Battery Load Test Voltage Chart: Pass Vs. Fail Results, means your battery is no longer capable of reliably starting your vehicle or supporting its electrical system. This is a definitive sign that replacement is necessary.
- Immediate Replacement: Do not delay. A failed battery will inevitably leave you stranded.
- Choose the Right Replacement: Select a new battery that matches or exceeds the original equipment manufacturer’s specifications for your vehicle, particularly in terms of CCA rating and physical size. Consider the battery type (flooded, AGM, etc.) and your driving habits. For example, if you have many accessories or drive in extreme cold, opting for a higher CCA or an AGM battery might be beneficial. More information on different battery types can be found on sites like Voltage Basics.
- Professional Installation vs. DIY: You can replace a battery yourself if you’re comfortable with basic hand tools and safety procedures. Alternatively, most auto parts stores offer installation services.
- Core Charge and Recycling: Batteries contain hazardous materials. When buying a new battery, you’ll typically pay a “core charge” which is refunded when you return your old battery for recycling. Always dispose of old batteries responsibly.
- Check Charging System After Replacement: Installing a new battery into a vehicle with a faulty charging system is a recipe for disaster. The new battery will quickly become damaged. After replacing the battery, start the vehicle and perform a quick check of the alternator’s output voltage to ensure it’s charging correctly (13.8V-14.7V).
- Investigate Underlying Causes (If Applicable): While batteries have a finite lifespan, premature failure (e.g., a battery less than 2-3 years old failing) might indicate an underlying issue with the vehicle.
- Overcharging: A faulty voltage regulator in the alternator can overcharge a battery, leading to premature electrolyte evaporation (in flooded batteries) or internal damage (in all battery types).
- Undercharging: A weak alternator or frequent short trips where the battery doesn’t get a full charge can lead to sulfation and early failure.
- Excessive Parasitic Drain: As mentioned, a constant draw can repeatedly discharge a battery, significantly shortening its life.
- Extreme Temperatures: Operating consistently in very hot or very cold climates without proper battery care can reduce longevity.
Conclusion
Understanding and utilizing the Battery Load Test Voltage Chart: Pass Vs. Fail Results is an indispensable skill for anyone involved in vehicle maintenance, from the seasoned mechanic to the everyday car owner. This comprehensive guide has illuminated the critical difference between a simple voltage reading and a thorough load test, emphasizing how the latter truly reveals a battery’s hidden strengths or weaknesses. By simulating real-world starting conditions, a load test provides an objective, data-driven assessment of your battery’s ability to perform when it matters most.
We’ve covered the essential factors that influence load test results, such as the battery’s state of charge, CCA rating, and ambient temperature, providing clear pass/fail thresholds. The detailed charts serve as invaluable tools, helping you pinpoint whether your battery is a reliable workhorse or a ticking time bomb. Remember, a battery that merely passes with a marginal reading might still be nearing its end, signaling the need for proactive planning rather than reactive panic.
Moreover, this article has provided a step-by-step guide to safely and accurately perform a load test, along with crucial post-test actions. Whether your battery passes, requiring continued routine maintenance and monitoring, or fails, necessitating immediate replacement and an investigation into potential underlying vehicle issues, the knowledge gained from this process is empowering.
In 2026, with increasing reliance on vehicle electronics, a healthy battery is more critical than ever. Regular load testing, armed with the insights from a robust Battery Load Test Voltage Chart: Pass Vs. Fail Results, is your best defense against unexpected breakdowns and ensures your vehicle remains a dependable companion on the road. Don’t wait for the click-click-click of a dead battery; be proactive, test your battery, and drive with confidence.
Actionable Next Steps:
- Acquire a Load Tester: If you don’t already own one, invest in a quality battery load tester.
- Charge Your Battery: Ensure your vehicle’s battery is fully charged before attempting any load test.
- Perform an Annual Load Test: Make battery load testing a routine part of your vehicle maintenance, especially before seasonal temperature changes.
- Keep this Chart Handy: Refer to the provided Battery Load Test Voltage Chart: Pass Vs. Fail Results (or your tester’s specific guidelines) for accurate interpretation.
- Act Decisively: If your battery fails, replace it promptly. If it passes but is old, consider a proactive replacement to prevent future headaches.
- Investigate Further: If electrical issues persist after a passing load test, expand your diagnostics to the starter, alternator, and wiring.