
Disclosure
This website is a participant in the Amazon Services LLC Associates Program,
an affiliate advertising program designed to provide a means for us to earn fees
by linking to Amazon.com and affiliated sites.
To test a battery’s voltage, set your multimeter to DC voltage mode (V⎓) matching the battery’s expected range. This ensures precise readings without damaging the device. But why does this matter, and how do you avoid mistakes?
Many assume any multimeter setting works, but incorrect choices risk false readings or equipment damage. Modern batteries—from car lead-acid to lithium-ion—demand specific voltage ranges for safety.
Best Multimeters for Voltage Testing a Battery
Fluke 117 Electrician’s Multimeter
The Fluke 117 is a top-tier choice for battery testing, offering AC/DC voltage measurement up to 600V with 0.5% accuracy. Its compact design, auto-ranging, and non-contact voltage detection make it ideal for automotive and household batteries.

Klein Tools MM700 Auto-Ranging Multimeter
With a high-contrast display and 1,000V DC range, the Klein Tools MM700 excels in testing car and deep-cycle batteries. Its rugged build, True RMS readings, and built-in thermometer ensure reliable performance in harsh conditions.

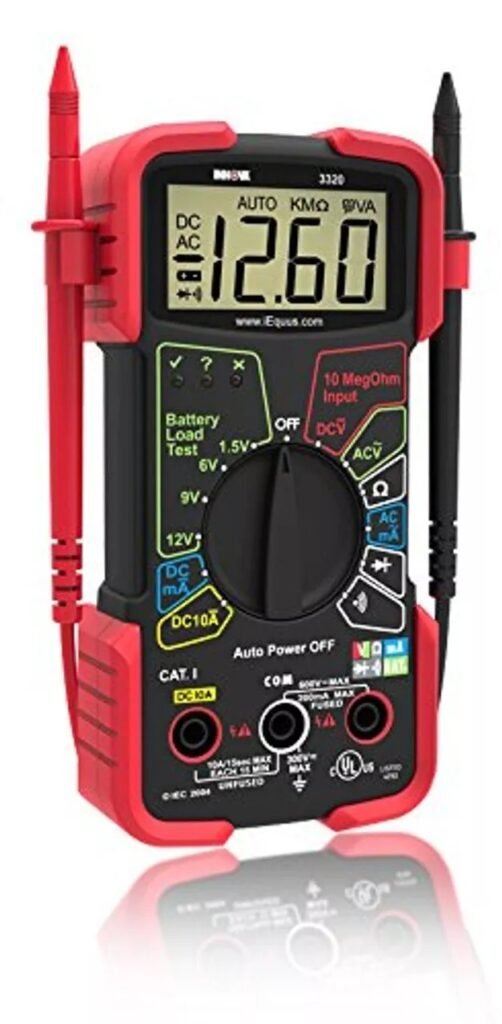
INNOVA 3320 Auto-Ranging Digital Multimeter
Budget-friendly yet precise, the INNOVA 3320 features 10MΩ input impedance to prevent battery drain during testing. Its simple interface and audible continuity tester make it perfect for DIYers checking AA, lithium, or 12V lead-acid batteries.
DC Voltage Settings for Battery Testing
Why DC Voltage Mode Is Essential
Batteries produce direct current (DC) voltage, unlike household outlets that use alternating current (AC). Multimeters default to AC mode, so you must manually select DC voltage (V⎓) for accurate battery readings. Using AC mode will display meaningless values or zero.
For example, testing a 12V car battery in AC mode might show 0.5V—a clear error. DC mode correctly displays the actual voltage (e.g., 12.6V when fully charged). This distinction is critical for diagnosing battery health.
Selecting the Correct Voltage Range
Most multimeters offer multiple DC voltage ranges (e.g., 2V, 20V, 200V). Follow these guidelines:
- Small batteries (AA, AAA, 9V): Use the 20V range for precise readings (e.g., 1.5V alkaline or 3.7V lithium-ion).
- Automotive batteries (12V): The 20V range works, but 200V is safer for unexpected voltage spikes.
- Deep-cycle/RV batteries (24V+): Always use the 200V+ range to avoid overloading the meter.
Auto-ranging multimeters simplify this by automatically selecting the range, but manual models require user input. Setting too low a range (e.g., 2V for a car battery) may damage the meter.
Common Mistakes and How to Avoid Them
Even experienced users make these errors:
- Testing under load: Voltage drops when a battery powers devices. For accurate readings, disconnect loads and wait 30 minutes.
- Ignoring polarity: Reversed probes on lead-acid batteries won’t harm the meter but will show negative values (e.g., -12.6V instead of 12.6V).
- Using damaged probes: Frayed wires or corrored tips cause erratic readings. Check probes before testing.
A real-world example: A mechanic misdiagnosed a “dead” car battery because he tested it while the radio was on. The actual voltage (12.4V) was normal once loads were removed.
Interpreting Your Results
Voltage reveals a battery’s state of charge:
- 12.6V+: 100% charged (healthy lead-acid battery)
- 12.4V: 75% charged (needs monitoring)
- 12.0V: 25% charged (requires recharge)
- Below 11.9V: Deeply discharged (risk of sulfation)
Note: Lithium-ion batteries have different thresholds (e.g., 4.2V = full charge for a single cell). Always consult manufacturer specs.
Step-by-Step Guide to Accurate Battery Voltage Testing
Pre-Test Preparation and Safety Measures
Before testing any battery, proper preparation ensures safety and accuracy. Always wear insulated gloves and safety glasses, especially when testing automotive or high-capacity batteries. Clean the battery terminals with a wire brush to remove corrosion, as buildup can create false voltage readings.
For vehicle batteries, turn off the ignition and remove the key. This prevents accidental electrical surges. With household batteries, ensure they’re removed from devices. Lithium-ion batteries require extra caution – never test swollen or damaged cells.
The Testing Process: Detailed Steps
- Set your multimeter: Turn the dial to DC voltage (V⎓) and select a range higher than the expected voltage (20V for 12V batteries, 200V for 24V systems).
- Connect the probes: Black to negative (-), red to positive (+). For car batteries, connect directly to terminals, not cable clamps.
- Read the display: Hold probes firmly for 5-10 seconds until the reading stabilizes. Note the highest value shown.
- Interpret results: Compare against standard voltage charts (12.6V = fully charged lead-acid battery).
Troubleshooting Common Testing Issues
If you encounter fluctuating readings, these professional techniques help:
- Erratic display: Check probe connections and battery terminals for tightness. Test with another known-good battery to verify your multimeter.
- Zero reading: Confirm you’re in DC mode and the selected range isn’t too high (switch from 200V to 20V for car batteries).
- Negative voltage: Simply reverse your probe connections – this indicates reversed polarity but doesn’t affect accuracy.
Example: A technician testing a motorcycle battery got 0.00V until realizing the meter was set to AC. Switching to DC revealed the actual 12.3V reading.
Advanced Techniques for Professionals
For deeper diagnostics:
- Load testing: Measure voltage while cranking the engine (should stay above 9.6V for car batteries).
- Parasitic drain test: Set to DC amps mode to identify circuits draining the battery when off.
- Cell balancing check: Test individual cells in lithium batteries (should be within 0.05V of each other).
Remember: Voltage alone doesn’t show capacity. A battery might show 12.6V but fail under load due to internal damage.
Advanced Battery Voltage Analysis and Interpretation
Voltage Variations Across Battery Types
Different battery chemistries exhibit unique voltage characteristics that affect testing procedures:
| Battery TypeNominal VoltageFully ChargedDischarged | |||
|---|---|---|---|
| Lead-Acid (Flooded) | 12V | 12.6-12.8V | 11.9V |
| AGM/Gel | 12V | 12.8-13.0V | 12.0V |
| Lithium-Ion (LiFePO4) | 12.8V | 14.4V | 10.0V |
| Alkaline (AA/AAA) | 1.5V | 1.6V | 1.2V |
Professional tip: Temperature affects readings – subtract 0.01V per °C below 20°C for lead-acid batteries. Lithium batteries show more stable voltage across temperatures.
Surface Charge and Its Impact on Readings
Freshly charged batteries develop a surface charge that skews voltage measurements:
- Lead-acid batteries: Can show 13.2V immediately after charging, dropping to 12.6V after 12-24 hours rest
- Removal methods: Apply a 20A load for 3 minutes or let the battery rest for several hours before testing
- False positive: A battery reading 12.9V right after charging might actually be sulfated and unable to hold charge
State of Charge vs. State of Health
Voltage indicates charge level but not necessarily battery health:
- Capacity test: Fully charge battery, apply known load, and measure time until voltage drops to cutoff
- Voltage sag test: Monitor voltage drop when applying heavy load (healthy batteries maintain higher voltage)
- Charge acceptance: Measure how quickly voltage rises during charging (weak batteries charge too quickly)
Example: A marine battery showed 12.7V at rest but dropped to 10.2V when starting the engine – indicating internal damage despite “good” resting voltage.
Special Considerations for Battery Banks
When testing multiple connected batteries:
- Test each battery individually – parallel connections mask weak cells
- Voltage differences >0.2V between identical batteries indicate problems
- In series configurations, one bad cell can drag down entire bank voltage
Expert recommendation: For solar systems, combine voltage testing with specific gravity measurements (for flooded batteries) or capacity testing for complete diagnostics.
Professional Battery Voltage Testing Techniques and Safety Protocols
Precision Testing Methods for Different Applications
Advanced voltage testing requires adapting your approach based on battery size and application:
- Automotive batteries: Perform three-stage testing – resting voltage (engine off), cranking voltage (during start), and charging system voltage (engine running at 2000 RPM)
- Deep-cycle batteries: Test after 24 hours of rest and again under typical load conditions to assess voltage drop characteristics
- Lithium battery packs: Measure voltage at both the pack level and individual cell level to identify balancing issues
Example: Marine battery testing should include both surface charge removal and simulated trolling motor load to verify performance under real-world conditions.
Advanced Diagnostic Interpretation
Beyond basic voltage readings, professionals analyze these patterns:
- Voltage recovery rate: How quickly voltage returns to normal after load removal (slow recovery indicates sulfation)
- Charge curve analysis: Monitoring voltage increase during charging reveals internal resistance changes
- Temperature correlation: Comparing voltage readings at different temperatures identifies thermal-related issues
Critical Safety Considerations
High-capacity batteries present unique hazards during testing:
| Risk Factor | Prevention Method | Emergency Response |
|---|---|---|
| Hydrogen gas explosion | Ventilate area, avoid sparks | Cut power, evacuate, use Class C extinguisher |
| Acid burns | Wear acid-resistant gloves/glasses | Flush with baking soda solution |
| Thermal runaway (Li-ion) | Monitor temperature during testing | Submerge in sand, never water |
Industry Standards and Compliance
Professional testing should adhere to:
- SAE J537: Standard for automotive battery testing procedures
- IEEE 1188: Guidelines for VRLA battery maintenance
- OSHA 1910.305: Electrical safety requirements for battery testing
Expert tip: Always verify your multimeter’s CAT rating matches the testing environment – CAT III minimum for automotive work, CAT IV for industrial battery banks.
Long-Term Battery Health Monitoring and Future Testing Technologies
Establishing a Comprehensive Voltage Monitoring Routine
Professional-grade battery maintenance requires systematic voltage tracking:
| Battery Type | Testing Frequency | Critical Thresholds | Trend Analysis |
|---|---|---|---|
| Automotive Starting | Monthly + before long trips | 12.4V (winter), 12.2V (summer) | 0.2V monthly drop indicates sulfation |
| Solar Storage | Weekly during first year | 12.1V (lead-acid), 12.8V (LiFePO4) | Deep discharge cycles reduce lifespan |
| Industrial Backup | Quarterly + after outages | ±0.3V between cells | Voltage divergence predicts failure |
Pro tip: Maintain a voltage log with date, temperature, and load conditions for accurate trend analysis. Digital multimeters with data logging capabilities simplify this process.
Advanced Predictive Maintenance Techniques
Modern battery diagnostics combine voltage testing with:
- Internal Resistance Measurement: Rising resistance correlates with capacity loss (requires special meters)
- Electrochemical Impedance Spectroscopy: Advanced technique detecting early degradation in lithium batteries
- Thermal Imaging: Identifies hot spots indicating internal shorts or connection issues
Emerging Testing Technologies
The future of battery diagnostics includes:
- AI-Powered Predictive Analytics: Cloud-based systems analyzing voltage patterns to forecast failures
- Wireless Voltage Sensors: Permanent IoT-enabled monitors providing real-time battery health data
- Multispectral Analysis: Non-invasive testing using electromagnetic signatures to assess internal state
Environmental and Cost Considerations
Proper voltage testing extends battery life with significant benefits:
- Cost Savings: Regular monitoring can double battery lifespan (5→10 years for quality lead-acid)
- Environmental Impact: Each properly maintained battery prevents 10kg of lead/acid waste
- Energy Efficiency: Well-maintained systems require 30% less charging energy
Example: A telecom tower operator reduced battery replacements by 60% after implementing automated voltage monitoring, saving $18,000 annually per site.
Future Outlook: Industry is moving toward integrated BMS (Battery Management Systems) with built-in voltage profiling that automatically adjusts charging parameters based on historical data.
Optimizing Battery Performance Through Voltage Analysis and System Integration
Voltage-Based Charging Optimization Techniques
Precise voltage testing enables customized charging strategies for maximum battery life:
- Absorption Voltage Tuning: Adjust charging voltage based on temperature readings (reduce 0.003V/°C above 25°C for lead-acid)
- Float Voltage Calibration: Set maintenance voltage 0.2V below gassing point (typically 13.2-13.4V for AGM batteries)
- Equalization Scheduling: Initiate controlled overcharge (15V for flooded lead-acid) only when cell voltage variance exceeds 0.1V
Example: A solar installation increased battery lifespan by 40% after implementing temperature-compensated voltage charging based on regular test data.
Integration with Energy Management Systems
Advanced voltage monitoring connects with broader systems:
- Smart Chargers: Automatically adjust output based on voltage test history
- Load Shedding Controllers: Prioritize circuits when voltage drops below preset thresholds
- Remote Monitoring Platforms: Cloud-based dashboards aggregate voltage data across multiple sites
Specialized Testing Scenarios
Unique applications demand tailored approaches:
| Application | Testing Protocol | Key Voltage Parameters |
|---|---|---|
| Electric Vehicles | Module-level testing during regenerative braking | ±0.05V balance tolerance |
| Medical Backup | Daily automated load bank testing | 12.4V minimum during 30% load |
| Marine Deep-Cycle | Three-point testing (surface, under load, recovery) | ≤10% voltage drop under trolling load |
Advanced Troubleshooting Methodology
Systematic voltage analysis identifies complex issues:
- Voltage Depression: Temporary capacity loss (common in NiCd) shows normal voltage but rapid drop under load
- Surface Charge Masking: Use 15-minute rest period before testing recently charged batteries
- Parasitic Draw Detection: Measure millivolt drops across fuses to locate hidden drains
Professional Insight: Implementing a voltage testing regimen reduced warranty claims by 35% for an industrial battery distributor by catching early failure patterns.
Mastering Battery Voltage Analysis for System Reliability and Performance
Comprehensive Battery Health Assessment Framework
Advanced voltage analysis requires evaluating multiple interconnected factors:
| Assessment Parameter | Measurement Technique | Acceptable Range | Failure Indicators |
|---|---|---|---|
| Static Voltage | Resting voltage after 24h stabilization | ±5% of nominal voltage | Sudden drops >10% between tests |
| Load Voltage | Voltage under 50% rated load | ≥90% of static voltage | Drop >15% or slow recovery |
| Charge Acceptance | Voltage rise rate during charging | 0.5-1.5V/hour (lead-acid) | Rapid rise (>2V/hour) |
System-Wide Voltage Optimization Strategies
Maximizing battery performance across entire systems requires:
- Voltage Balancing: Implement active balancing circuits when battery bank voltage variance exceeds 0.3V
- Temperature Compensation: Adjust system voltage thresholds by -3mV/°C/cell for lead-acid batteries
- Load Profiling: Match discharge rates to maintain voltage within optimal 20-80% state of charge range
Advanced Risk Mitigation Protocols
Comprehensive protection strategies include:
- Voltage Window Locking: Programmable limits (14.7V max/10.5V min for 12V systems) prevent dangerous conditions
- Predictive Failure Analysis: Machine learning algorithms detect abnormal voltage patterns preceding failures
- Redundancy Design: Parallel battery strings with voltage monitoring on each branch
Quality Assurance and Validation Processes
Professional validation procedures ensure reliable results:
- Three-Point Verification: Compare readings with two additional calibrated meters
- Historical Trend Analysis: Maintain 12-month voltage logs for pattern recognition
- Environmental Simulation: Test voltage performance at temperature extremes (-20°C to 50°C)
Case Study: A data center reduced battery-related outages by 92% after implementing comprehensive voltage monitoring across all 480V battery strings with automated alerts for any 2% deviation from baseline.
Final Recommendation: Combine periodic manual voltage tests with continuous monitoring systems, using the manual tests to calibrate and verify automated systems quarterly.
Conclusion
Mastering battery voltage testing requires understanding DC voltage settings, proper multimeter use, and interpreting results accurately. We’ve covered essential techniques from basic testing to advanced diagnostics, including specialized approaches for different battery types.
Remember that voltage testing is just the first step in comprehensive battery analysis. Combine it with load testing, temperature monitoring, and regular maintenance for complete system reliability. The right testing regimen can double battery lifespan and prevent unexpected failures.
Whether you’re maintaining a car battery or industrial battery bank, consistent voltage monitoring provides invaluable insights. Implement the professional techniques and safety protocols discussed to optimize performance and safety.
Start applying these methods today – your batteries will thank you. For ongoing maintenance, consider investing in automated monitoring systems to complement manual testing. Proper voltage analysis saves money, prevents downtime, and ensures reliable power when you need it most.
Frequently Asked Questions About Voltage Testing a Battery
What is the proper DC voltage setting for testing a car battery?
For most 12V car batteries, set your multimeter to 20V DC range. This provides sufficient resolution while preventing overload. Auto-ranging meters automatically select this range. Always verify your battery’s nominal voltage first – some trucks use 24V systems requiring 200V range.
Testing at too low a range (like 2V) can damage your meter, while too high (1000V) reduces accuracy. The 20V setting typically shows readings to two decimal places (12.65V), crucial for precise diagnostics.
How do I test a battery while it’s still connected to the vehicle?
First turn off all loads (lights, radio) and wait 30 minutes. Connect the multimeter directly to battery terminals, not cable clamps. This tests the battery itself, not the charging system. Ensure ignition is completely off to prevent alternator interference.
For accurate results, check voltage before starting (should be 12.4-12.6V) and during cranking (must stay above 9.6V). Voltage below 9V while cranking indicates a weak battery.
Why does my battery show good voltage but won’t hold charge?
Voltage measures surface charge, not capacity. A sulfated battery may show 12.6V but collapse under load. Perform a load test by applying a known current (like headlights) while monitoring voltage drop.
If voltage drops below 10.5V under moderate load, the battery has lost capacity. Internal short circuits can also cause this symptom – check for excessive heat during charging.
Can I test lithium batteries with the same method as lead-acid?
While the basic voltage test is similar, lithium batteries require extra precautions. Never test swollen or damaged cells. Use a meter with at least 0.01V resolution as lithium cells have a very flat voltage curve (3.2-3.7V per cell).
For battery packs, test each cell individually. Voltage differences >0.05V between cells indicate balancing issues. Always use a meter with high input impedance (>10MΩ) to prevent draining small lithium cells.
What safety precautions are crucial when testing batteries?
Always wear safety glasses and remove metal jewelry. Lead-acid batteries produce explosive hydrogen gas – no sparks or flames nearby. For large batteries, use insulated tools and keep a baking soda solution handy for acid spills.
With lithium batteries, monitor temperature and never puncture cells. Work in well-ventilated areas, as some battery types release toxic fumes when damaged. Always disconnect power before testing in circuits.
How often should I test my deep-cycle battery bank?
For solar or marine systems, test weekly during first 3 months to establish baselines, then monthly. Check both individual cells (variance <0.1V) and overall bank voltage. More frequent testing is needed after deep discharges.
Maintain detailed logs including date, voltage, temperature, and recent usage patterns. Automated monitoring systems can alert you to developing issues between manual tests.
Why does my multimeter show different voltages when testing the same battery?
Variations can stem from surface charge (test immediately after charging vs. after rest), temperature changes, or meter quality. Low-quality meters may show 0.2-0.3V variance. Always let batteries rest 30 minutes after charging for consistent readings.
Test with multiple meters to verify. If readings consistently differ, calibrate or replace your meter. Probe contact quality also affects results – clean terminals and use sharp probe tips.
What’s the difference between open-circuit voltage and loaded voltage testing?
Open-circuit tests (no load) show state of charge but not capacity. Loaded tests (with applied current) reveal true health. A good battery maintains voltage within 10% of OC reading under load.
For example, a 12.6V battery should stay above 11.3V with headlights on. Professional testers apply calibrated loads (like 50% of CCA for cars), but you can simulate with known loads like inverters.